Your First Watercolor Experiment
Alright so you’ve got your paints, your brushes, and your paper. Perhaps you’ve even rearranged your art supplies a few times until they look nicely set out… And yet somehow, the terrifying question remains: how do you actually begin?
Well here’s the good news: you don’t need to begin with a masterpiece. In fact, in this lesson we’re going to do something very simple and undemanding.
All you’re going to do is play with color.
No complicated shapes, no perfect brush control. We’re just going to use the warm and cool primary colors we talked about earlier in the supplies section, and start by blending two colors together.
You’ll see one color bleeding into the other, and then notice what starts to happen in the middle.
Along the way you’ll see some surprising and beautiful things happen: the paint might create strange, unexpected hues, merge in ways you didn’t plan, and occasionally gift you what watercolorists like to call a “happy accident.”
So what’s the point of this little exercise? Well, a few things:
- First, you’ll start to get a feel for mixing colors – seeing how different primaries combine, and sometimes in quite surprising ways.
- You’ll notice that even though they’re all “primary” colors, the mixtures don’t always come out bright and vivid. This is your first glimpse at how warm and cool versions of each color actually mix (by the way we’ll explore this in much more detail later in the mixing module).
- You’ll also see how paints interact directly on the page while still wet. That’s the foundation of the wet-on-wet watercolor technique, which you’ll be using again and again.
- Just as importantly, this gives you the very first bit of familiarity with handling watercolor paints – which behave very differently from, say, acrylics.
- And finally, it’s about building momentum and making a start. Because once you’ve put brush to paper, everything else becomes much easier.
So, for this exercise I’ll show you how to paint some watercolor gradients. Basically, a gradient involves mixing two colors and gradually blending them, to create a smooth transition from one color to the next.
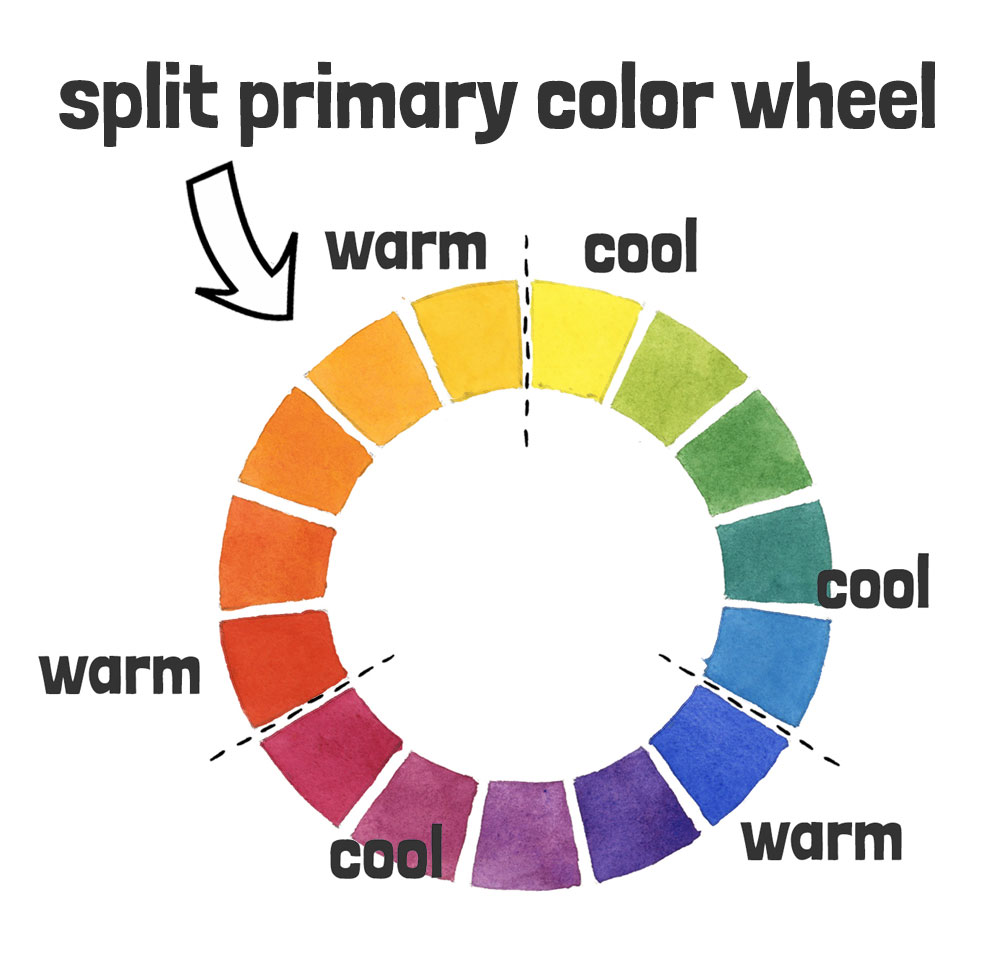
We’ll be using the warm and cool primary colors from my recommended paints. If you’re not sure what I mean by “warm” or “cool” just yet, don’t worry, we’ll dig into that properly later on. For now, I just want you to notice how these different primaries behave when you mix them:
- Warm yellow: Hansa Yellow Deep
- Cool yellow: Lemon yellow
- Cool blue: Phthalo blue Green Shade
- Warm blue: French ultramarine
- Cool red: Quinacridone rose
- Warm red:Pyrrol scarlet
Step 1.
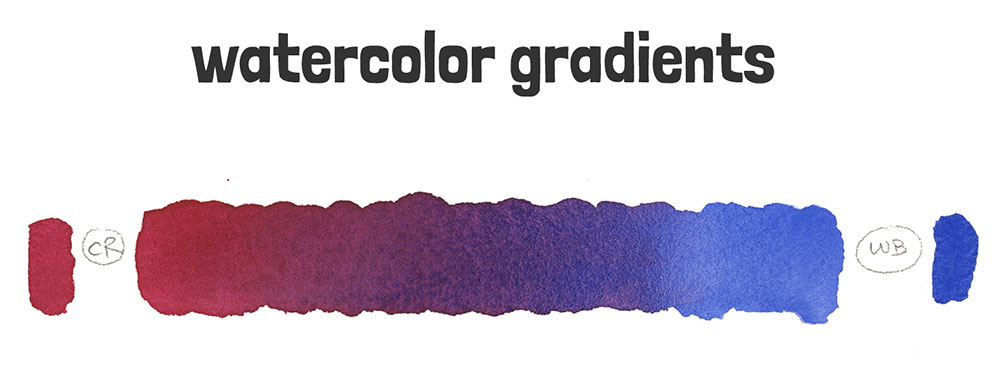
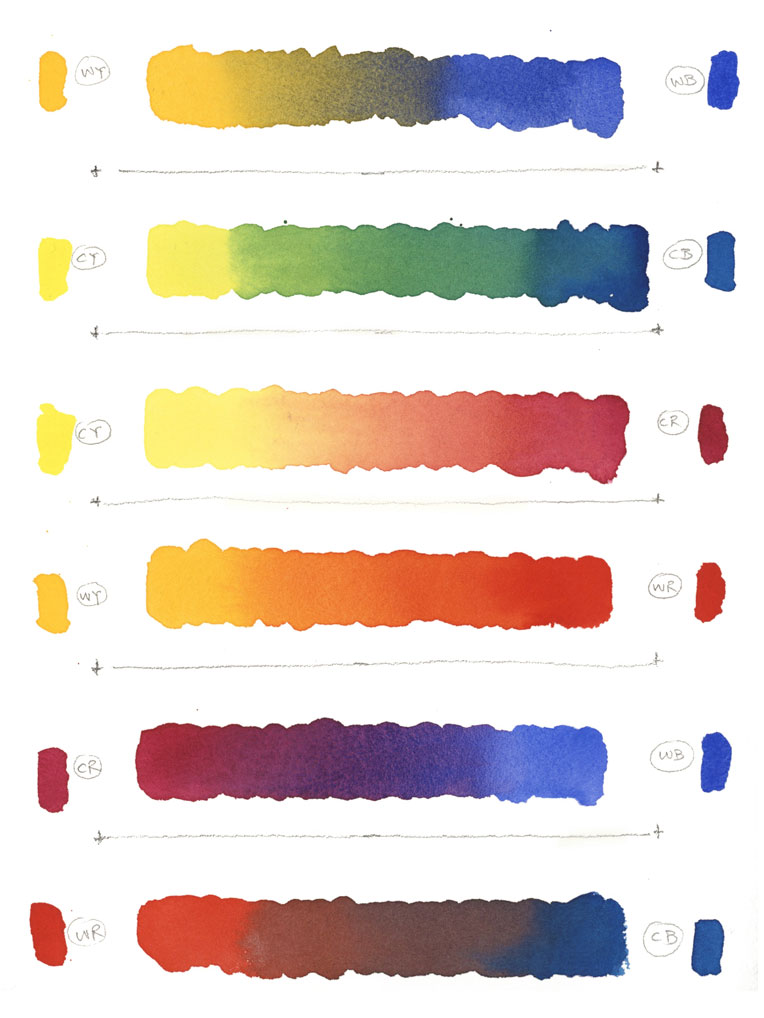
Take a sheet of watercolor paper and divide it roughly into six equal sections. But don’t worry about being precise. Then label each band with the pair of colors you’re going to use.
The sequence I used were as follows:

I also added a quick dab of paint next to the labels so that when you’re finished you’ll be able to see at a glance which two paints created each result.
Now, these pairs might look a bit random, but there’s a good reason for them. They actually follow the order of colors around a split primary color wheel – and that’s the foundation of understanding color mixing later in the course. For now, just trust the sequence and see what happens when each pair meets in the middle.
Next prepare your paints by adding a few drops of water into the paint wells and dampen your brush so it’s ready for use.
Start by mixing up two puddles of paint for your first pair of colors. In this case, I’m using Hansa yellow deep and French ultramarine.
Now here’s something to watch out for: if you mixed the blue puddle last, you need to rinse your brush really well before going back for the yellow. You want a clean, pure yellow to begin with not one that’s already tinged with blue.
But of course, that leads to another little problem…
When you’re working with small puddles of paint like this, your brush can actually soak up half the mix before you’ve even started. So if you’d like to save as much paint as possible for later, just gently squeeze the tip of your brush to release the color back into the palette. That way, you’re not wasting paint, and you’ve got plenty left to work with.
Step 2. Painting the Gradients
Okay, let’s paint the first gradient.
Start by loading your brush with pure yellow and begin painting a band of color on the left-hand side. Keep your brush nice and juicy with paint.
Next, dip the tip of your brush into the blue, and mix that into your yellow puddle. With this new color, paint the next part of the gradient, overlapping slightly with the yellow so the wet colors blend together. Then carry the stroke a bit further along to the right.
The aim is to keep the paint wet so the colors merge smoothly as you go. This is a “wet-on-wet” technique.
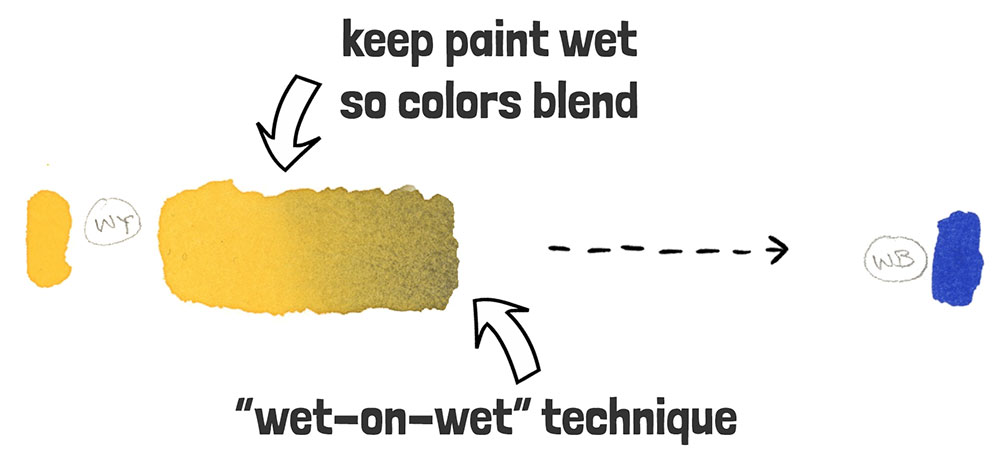
Now add a little more blue into your mix, which shifts the yellow gradually towards green. Paint the next section the same way – Overlap the previous stroke, then blend the edge, then extend your brush marks further along the gradient.
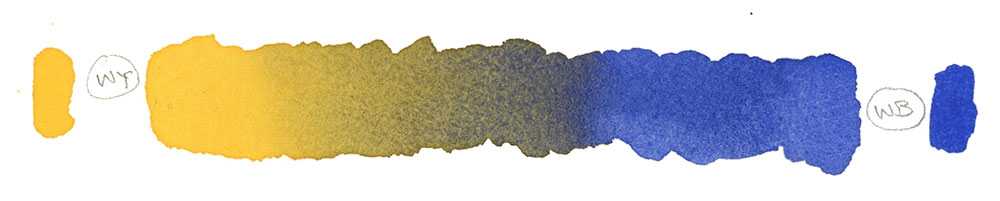
Do this once more, mixing blue into the yellow puddle.
At this point you’ll probably notice you’ve got two puddles of similar green on your palette. So it’s time to rinse your brush, then make a fresh puddle of blue.
Use that to continue the gradient, letting the blue merge naturally with the green that’s already wet on the paper. Then, for the final step, rinse quickly, grab some pure blue straight from the well if you like, and finish the band with a strong patch of blue at the far right.
Take a look at the finished result. You’ll see a smooth transition from yellow to blue, all thanks to the wet-on-wet blending technique.
Okay so let’s move on to the next gradient.
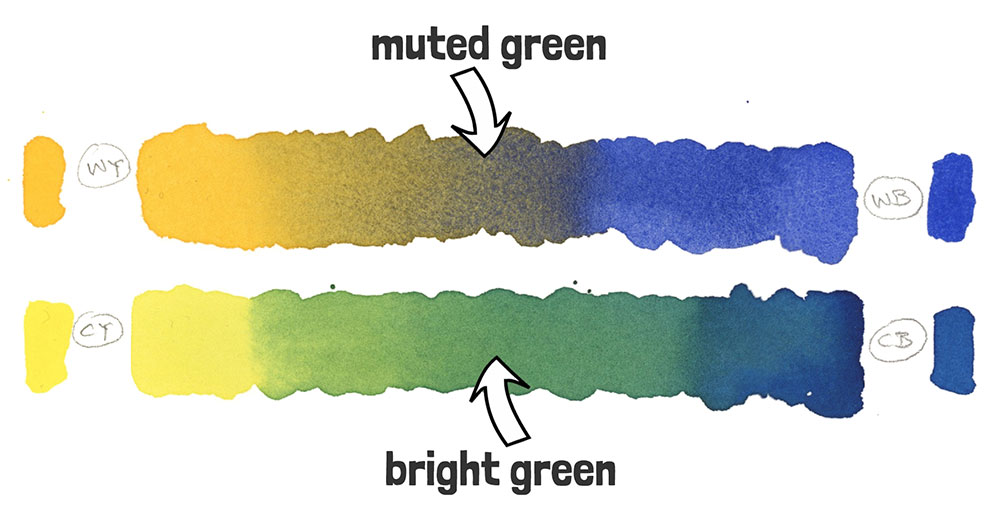
Wipe your palette clean, then mix up two new paint puddles. This time I’m using a cool yellow (in my case “lemon-yellow”) and a cool blue (which for me is “phthalo blue green shade”).
Repeat the same process as before… Begin with the yellow on the left, then gradually mix some blue paint into the yellow, and introduce the new paint mixture so the colors meet and merge.
Let the paint do the blending as you go, carrying the transition smoothly from yellow through green and finally into blue.
Rinse your brush and refresh your blue puddle as needed, and finish with a strong patch of pure blue at the far right. Don’t forget to keep your brush strokes nice and wet to help the wet-on-wet blending process.
Pause and compare this gradient with the previous one. Mixing different pairs of blues and yellows can produce some pretty surprising results! The first pair gave us a deep, muted green, while this pair creates a bright, vivid green.
If this feels a bit confusing, don’t worry – the color mixing module later in the course will explain everything.
For now, just enjoy the beautiful blends you’re creating…
Now it’s your turn to carry on and paint the rest of the gradients using the other color pairs we set up earlier. Take your time, and remember – this is all about experimenting, not aiming for perfection. Notice how each pair behaves a little differently, and just enjoy seeing those transitions blend beautifully together.
Also, notice how you felt while you were painting. Maybe you found yourself absorbed in the process, almost forgetting everything else around you. That’s one of the things I love most about watercolor – the way it gently pulls you into the moment, and how relaxing it feels once you get into the flow of painting.
When you’re done, you’ll have a whole page of beautiful color blends.
And this isn’t just about making something nice to look at – it’s actually one of the focused “skill drills” I’ll be sharing throughout the masterclass. These small, purposeful exercises are designed to help you practice core watercolor techniques in a simple, manageable way. Over time, this kind of practice is what builds real skill and confidence.”
Before you finish up completely, just a quick reminder: give your palette a clean so it’s ready for next time, close the lid to protect your paints from dust, and make sure to wash your brushes thoroughly. That way, everything will be fresh and ready to go the next time you sit down to paint!
Happy painting!