Getting Ready to Paint (Preparing Your Palette Paints & Brushes)
Okay, so let’s start at the very beginning – with the simple act of getting your stuff on the table and ready to paint.
Different artists might show various ways of doing this, but in this lesson I’ll show you my own setup and how I get started without overthinking it. By the end, you’ll know exactly how to arrange your palette, brushes, and water jars. And you’ll learn how to squeeze paint from tubes into a palette, how to begin a painting session by reactivating dried paints, getting your brushes ready, and mixing your first colors – so that when you lift your brush, you’re ready to focus on painting.
To begin we’re just laying things out.
Gather and Prepare
Here’s what to grab:
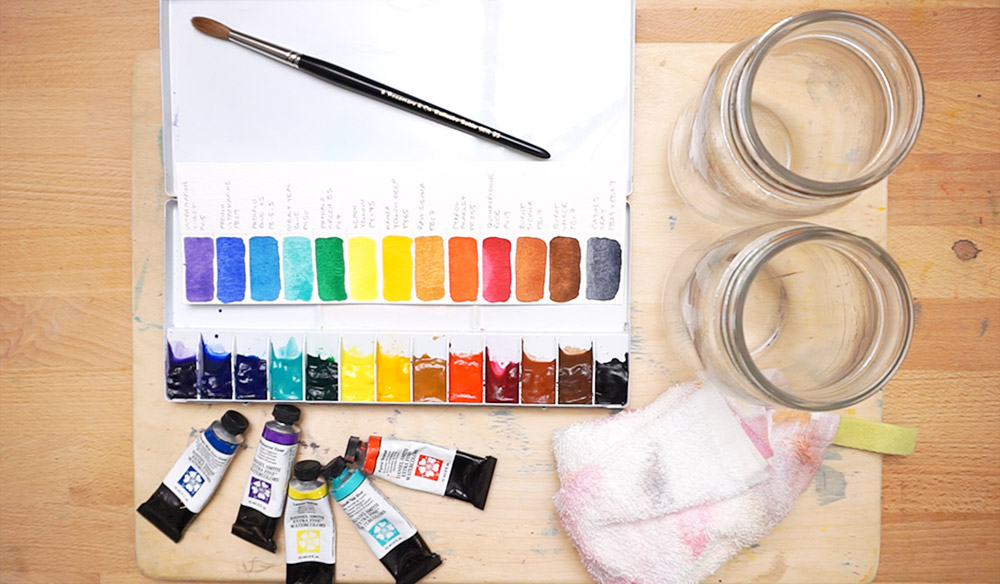
- Your palette – I’m going to demonstrate using the Holbein aluminum palette from my list of recommended supplies.
- A handful of paint tubes – I’ll be using my recommended colors.
- Two water jars – yes, two. One is for rinsing off your brush, the other is for picking up clean water. If you only use one jar, it gets murky pretty quickly, and then every time you pick up water with your brush, it either muddies your paints or adds dirty water straight into your mixes.
- A cloth or some absorbent tissue – honestly this is one of the most useful things on the table.
- And a brush – I’ll be using this large round brush.
The point of all this is not to create some perfect Instagram studio setup. It’s just about having a little routine: jars here, palette there, brushes to the side, and a cloth within reach.
The Palette and the Paints
Now that everything’s on the table, let’s turn to the palette itself.
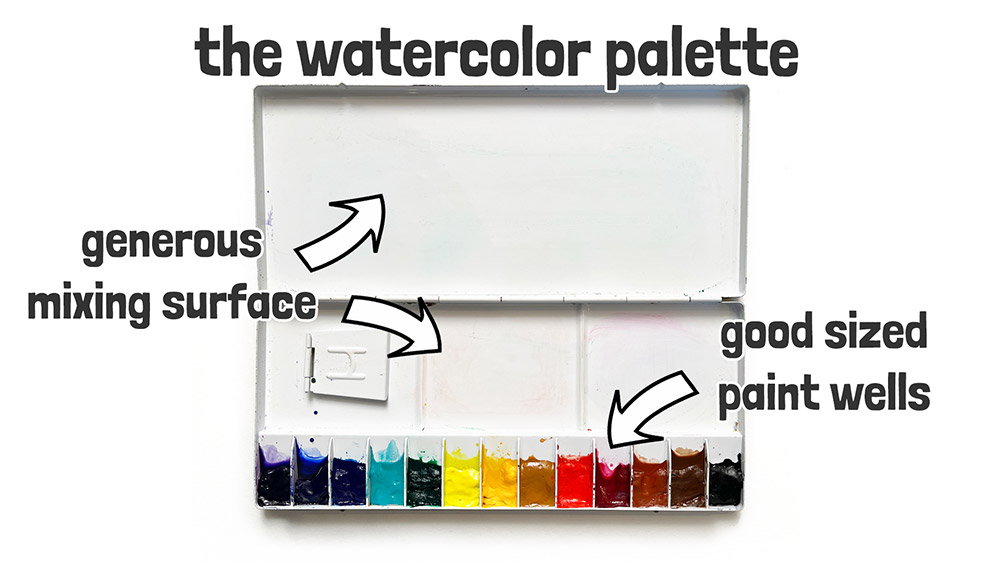
A good palette does two jobs: it gives you somewhere to store your paints and it gives you enough space to actually mix colors without feeling cramped. That’s why I like this Holbein palette. It has decent-sized wells for squeezing paint from tubes, plus a generous mixing surface in the lid.
Before you add any paint, there’s one small but important step – breaking in the mixing surface.
If you’ve ever tried using a brand-new palette, you’ll have noticed that the paint beads up into little droplets instead of spreading evenly on the surface. That’s because the shiny enamel surface is slightly water-repellent.
Over time it fixes itself with use. But if you’d rather not wait six months, you can gently scuff the surface with something mildly abrasive – For example, I’m using a magic eraser, (Some people also use baking soda mixed with a little water, or even toothpaste!)
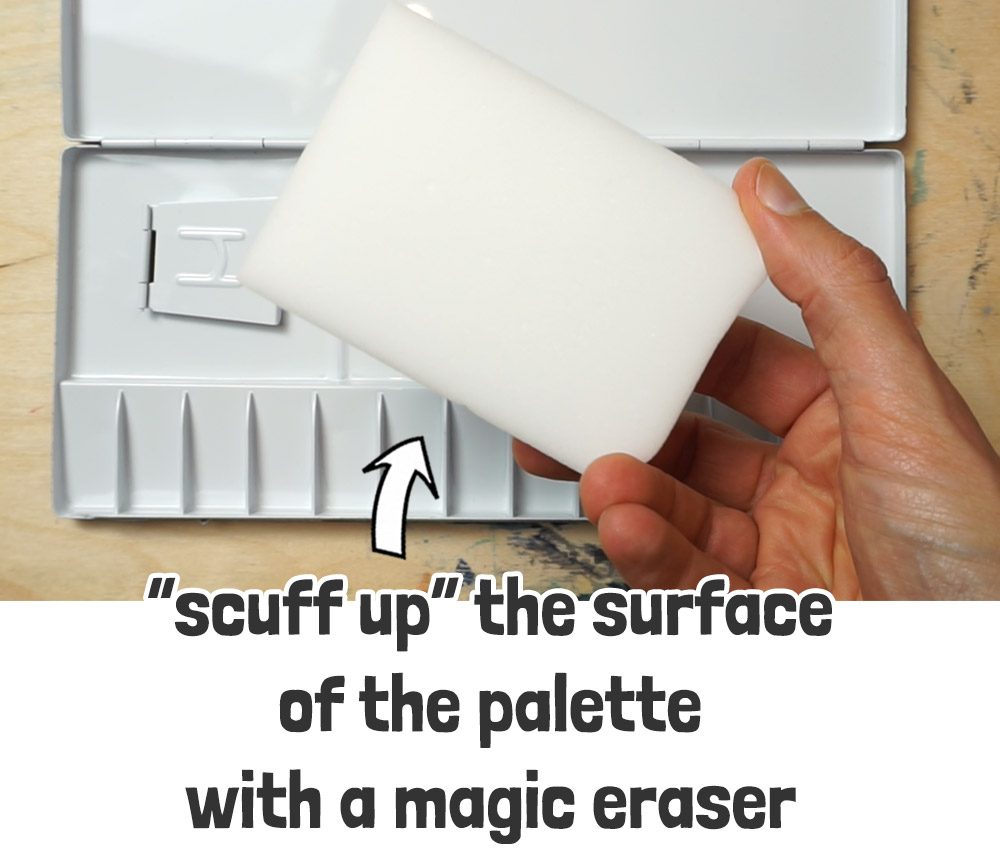
The goal is just to take the “new shine” off the surface so your paints spread better when you start mixing. Don’t go overboard and use anything too abrasive like sandpaper – this will create deeper scratches that can cause staining.
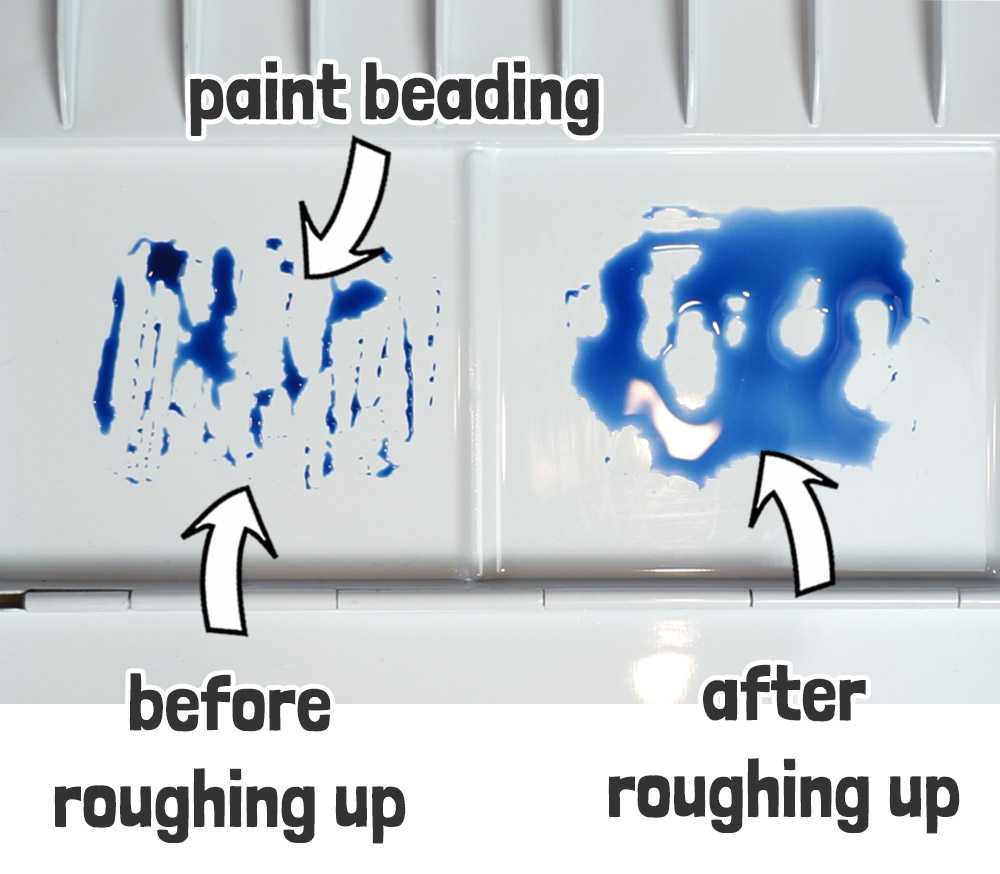
Here you can see the difference this makes to the spread of the mixing puddles before and after roughing up the surface:
You can also rough up the surface of the paint wells themselves. That way, when you add fresh paint, it has something to grip onto.
Alright, onto the paint. I’m using my recommended colors, but whatever tubes you’ve decided to use will work.
Setting up the travel palette
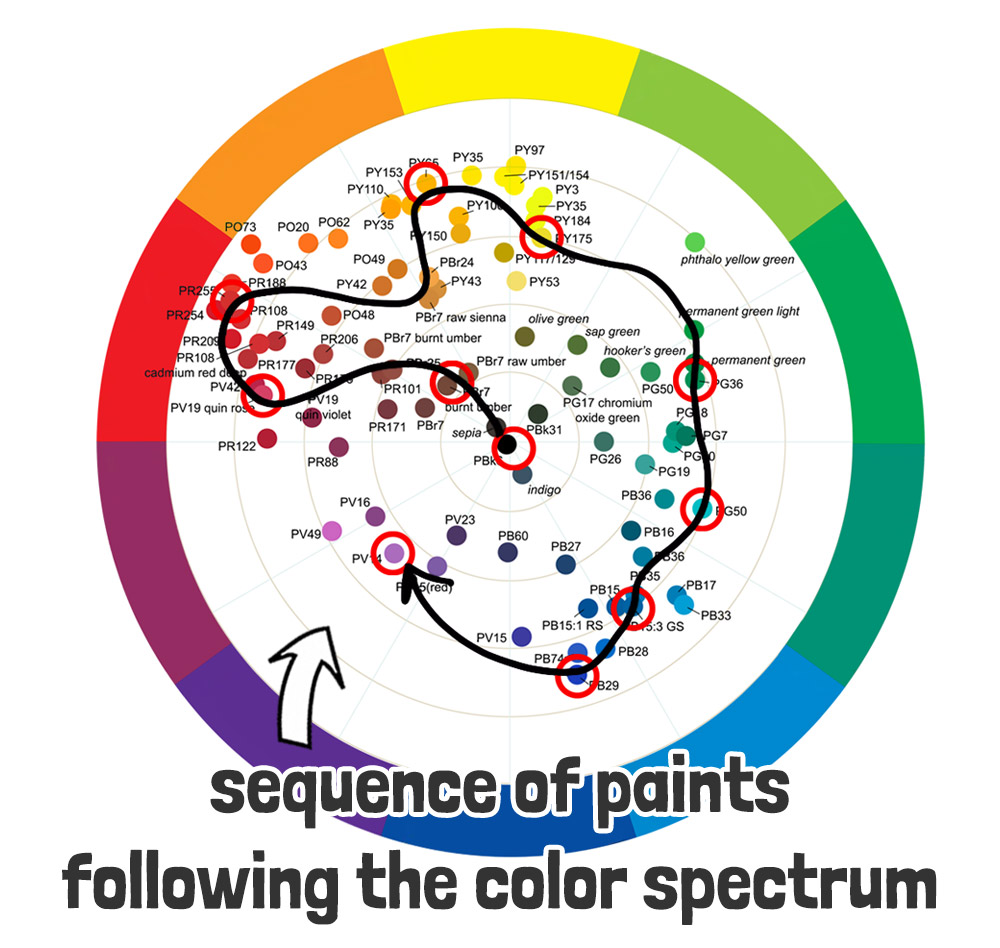
Like many artists, I arrange my paints in a logical sequence, grouping similar colors together according to the spectrum.
Most folks refer to this as “ROYGBIV” ! for red – orange – yellow – green – blue – indigo – violet – the acronym for remembering the sequence of hues that make up the color spectrum.
If you struggle to remember it, you can use one of those old-school mnemonics. The classic is “Richard Of York Gave Battle In Vain” – which is both memorable and slightly depressing! Personally, I just think of it as the name “Roy G. Biv” – Works just as well 🙂
With my paints this gives me the following setup:

Using a color map as a guide, you can see I started with gray and neutral brown colors, then worked my way clockwise around the color circle, pigment by pigment, ending with purple:
Before you start squeezing paint into the wells, it helps to line up the tubes in the order you want them to go – or at least keep a list handy so you don’t get the order mixed up.
Squeeze the paint into the wells, but don’t just dump it in. Aim for the corners first, moving the tip of the tube from side to side, and gradually build it up until the well is filled from three sides. This way the paint sits neatly without big gaps, and it’s less likely to crack and pull away from the edges when it dries.
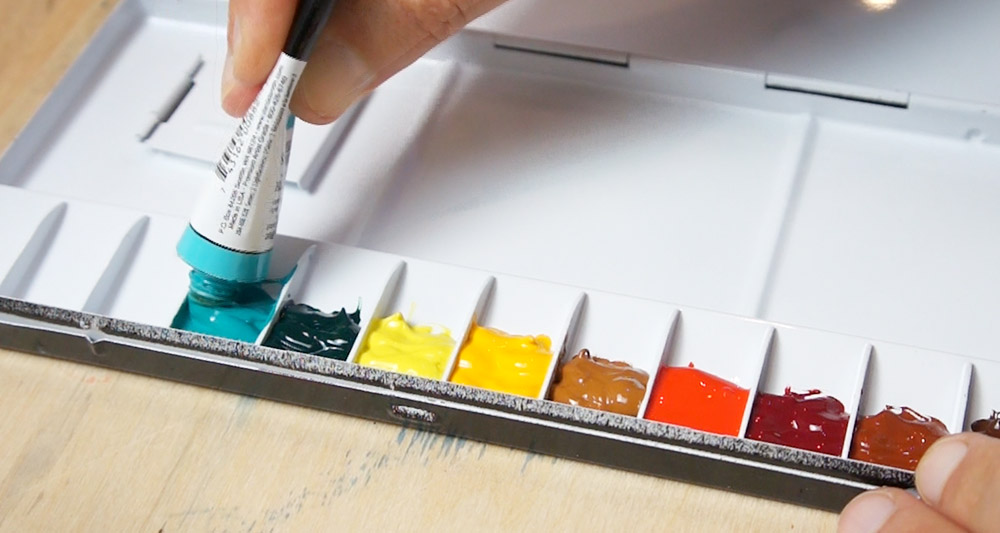
Oh, and here’s another important bit: don’t overfill the wells. If you try to cram too much paint in at once, it takes forever to dry and can stay sticky. A well that’s about a half or two-thirds full is ideal. This gives you plenty of color to work with. Remember, you can always top it up later…
Just keep filling the wells in the same order you planned out earlier.
The advantage of putting similar colors next to each other is less color contamination from adjacent paint wells. So even if a little paint does wander into the next well it’s hardly noticeable.Once the wells are filled, close the palette and leave it overnight so the paint can dry.
Waking Up the Paints and Mixing Your First Colors
So, your palette is now looking very official – nice neat rows of paint, all dried and ready.
At the start of a painting session, I use a small pipette to drop a bit of clean water into each paint well. A couple of drops are usually enough to reactivate the pigments.
Prepping the brush
But before you start, your brushes need a bit of preparation too. To do this, I dip mine into the clean water jar and give them a gentle squeeze a few times. This clears out any air bubbles hiding in the hairs and makes sure the brush is completely wet, right to the core. Basically, it primes the brush for action. Also, notice how the brush now has a nice pointed tip after wetting…

How to actually mix
From here, getting color onto the mixing surface is pretty straightforward. Just touch the tip of the brush into the softened pigment, place it into the mixing area, and swirl it around with some water.
There are actually a couple of ways you can do this.
One option is to pick up some of the softened paint first, wipe it onto the mixing surface, and then add water.
Or, you can start the other way around – put a few drops of water onto the mixing surface, dip into the softened paint, add it into that puddle, and mix.
The important thing here is to actually add water – this is watercolor, after all! And by the way, the size of your puddle should match the size of the shape you’re about to paint. That part gets easier with practice… and often, more mixed paint is better than not enough.
This is how you mix your first working paint puddles. Then you can adjust your mixtures as you progress…
Adjust on the fly
For example, if the mix is looking washed out, add a little more pigment. And if it looks too strong, just dip your brush back into water and swirl into the mix to lighten it.
You don’t need to start over each time – just keep nudging it in the right direction until it feels right.
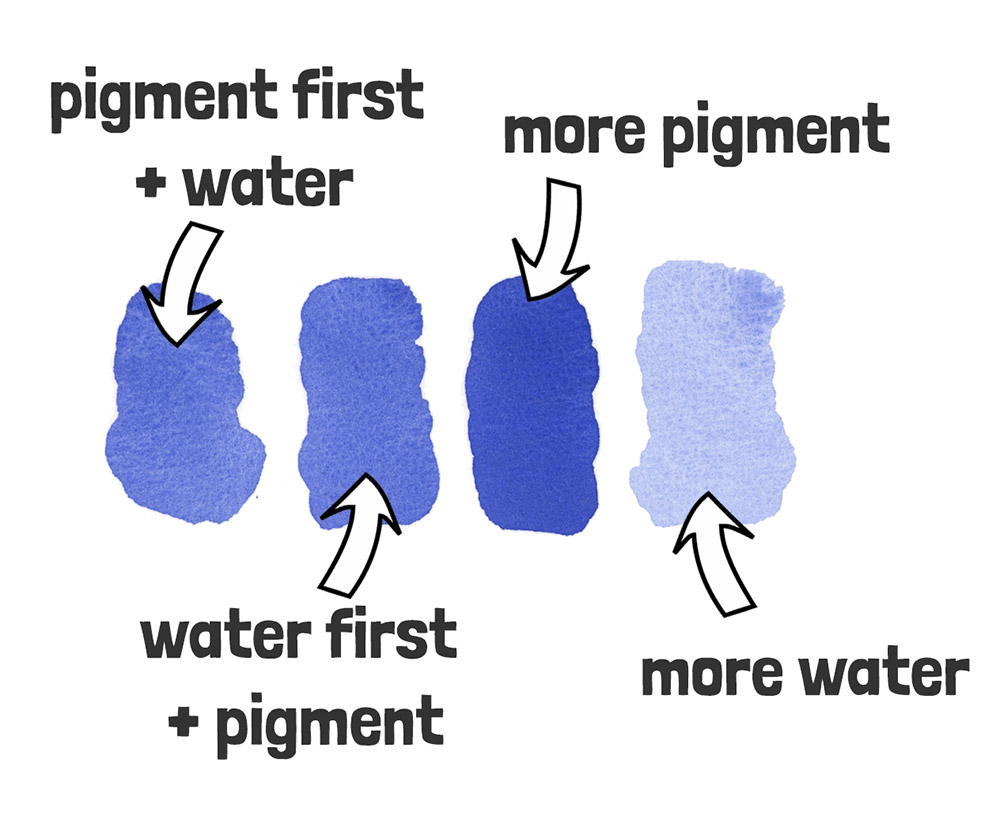
So, to sum up… these first two swatches show that it doesn’t really matter whether you start with pigment or with water – you can arrive at the same kind of mixture either way.
Then, it’s easy to adjust your puddles, either by adding pigment to make it richer, or adding water to lighten the color.
“Test swatch” habit
Here’s another useful tip: Before committing to your painting, make a quick brush mark onto a scrap piece of paper. Testing like this tells you more closely how the mixture actually looks. And it can save you from a few surprises!
Brush Control
And then there’s the cloth…
Keep it nearby to blot excess moisture from your brush. Sometimes you’ll want the brush wetter, sometimes drier. A quick dab on the cloth helps to control the wetness.
Putting It All Together: Paint Palette Chart
Now I’m going to show you a quick, low-pressure exercise that can make your life a lot easier later on – We’ll be painting a simple but very handy reference chart like this:
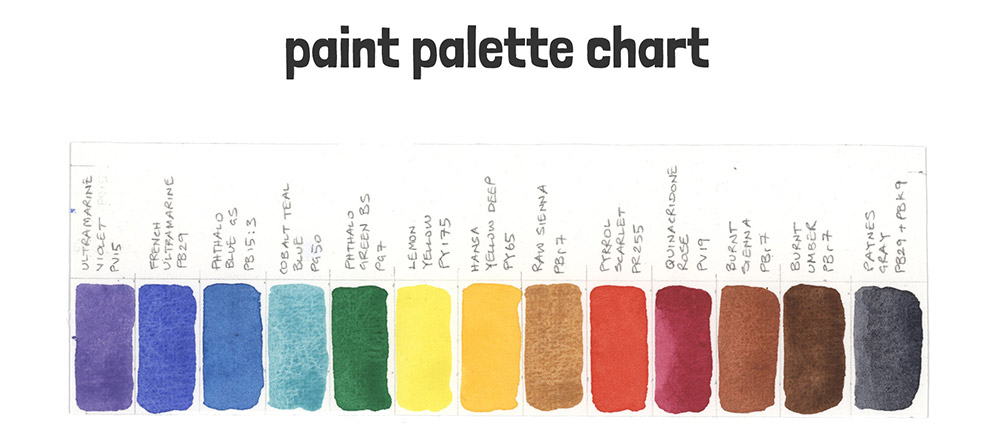
Once your paints dry in the palette, it can sometimes be tricky to tell them apart, especially the darker colors. A little chart like this is a useful cheat sheet. You can glance at it when you’re mixing and it stops you from asking yourself things like, “Which one is Burnt Umber again?” or “Where did I put the French Ultramarine?”
Okay, so let me show you how we can actually make this chart together.
Step 1 – Cut your paper to size
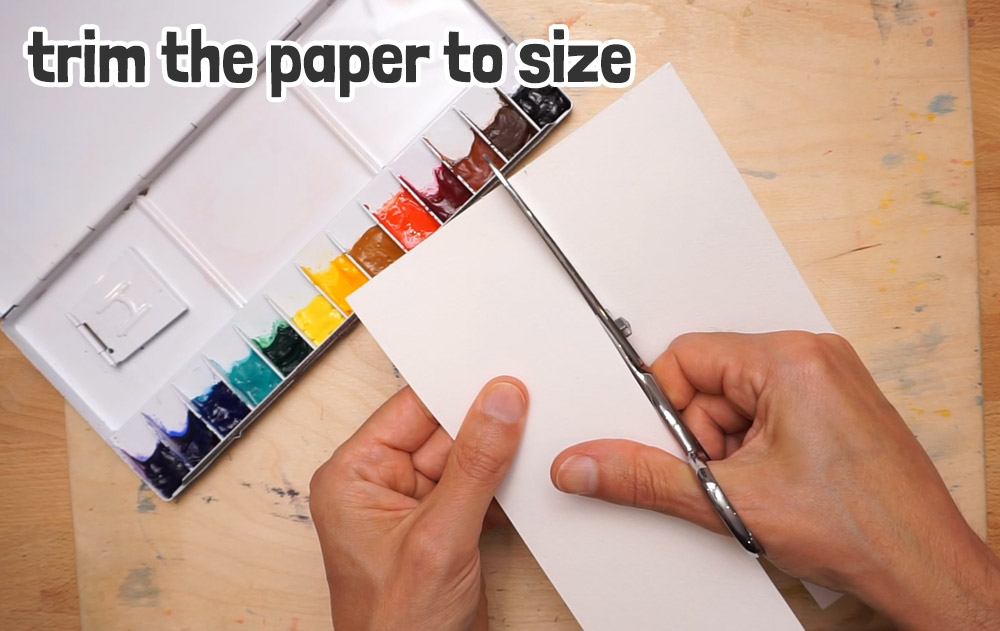
Grab a scrap of watercolor paper that’s roughly the size of your palette. I used a long strip about the same length as the palette, but with space for the color swatches and labels. Mine was too big, so I just trimmed it down.
Step 2 – Divide it into boxes
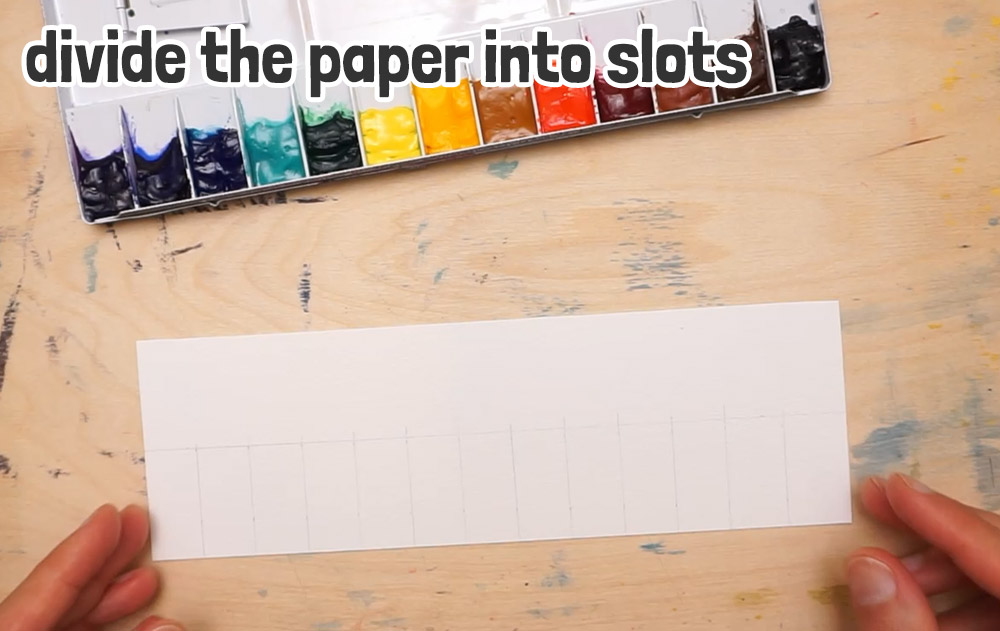
Since my palette holds thirteen paints, I used a ruler and pencil to divide the paper into thirteen little vertical boxes for swatching the colors. That gave me slots about three-quarters of an inch wide each.
Step 3 – Label the colors.
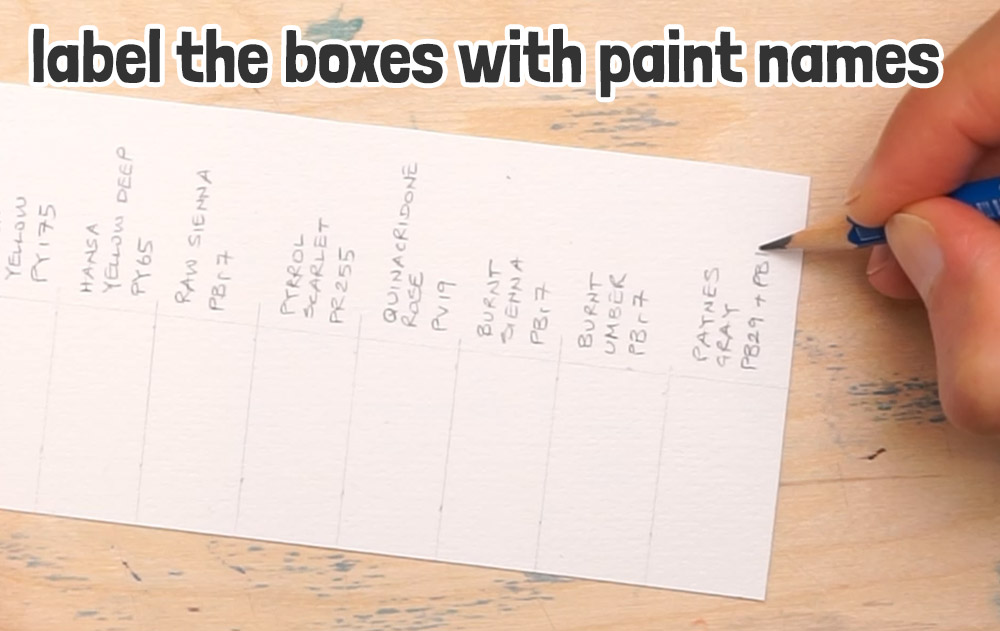
Above each box, write the paint name in pencil in the same order they appear in your palette. So for me, that started with Ultramarine Violet, then French Ultramarine, and so on. I also like to add the pigment number under each name. That way you get used to the pigment numbers, which is super handy if you ever switch brands later.
Step 4 – Prepare your paints.
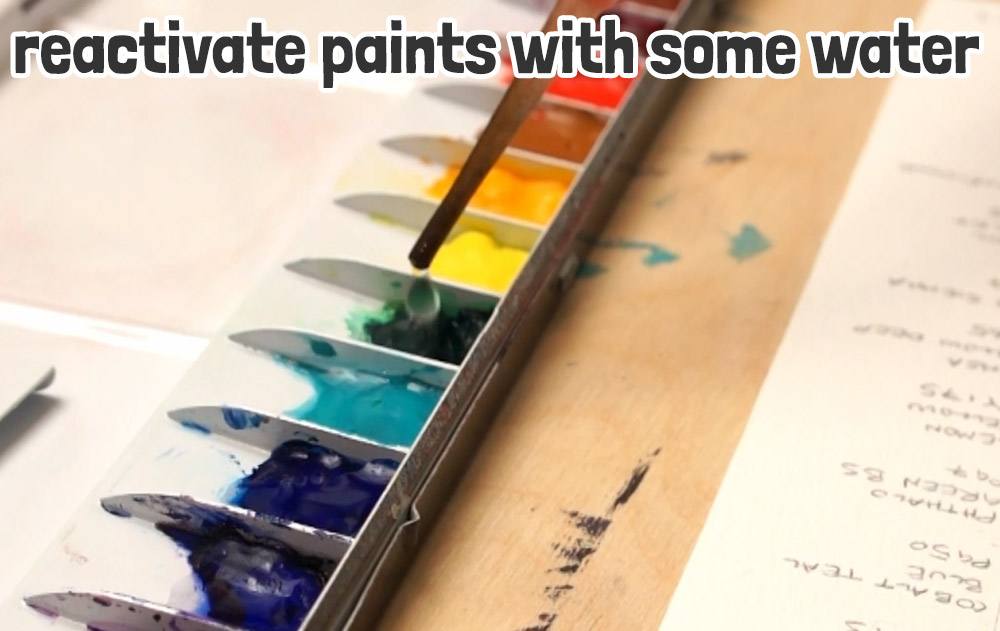
Drop a little clean water into each well to soften the paints. Give them a minute, and they’ll be ready to use.
Step 5 – Mix your first color.
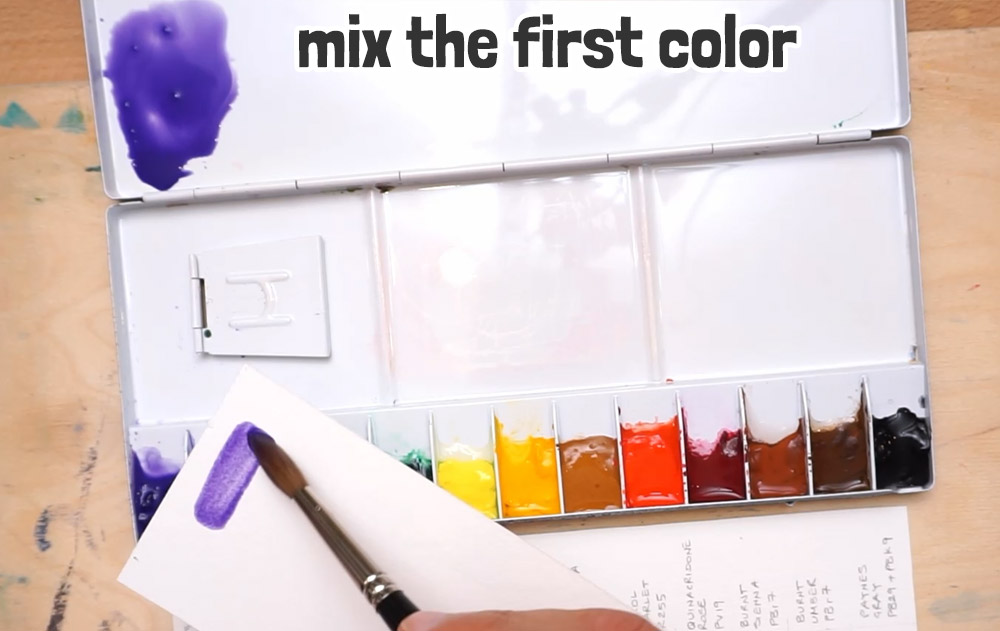
Start with the first paint color in your palette. Mix up a medium-strength puddle then test it on a scrap of paper to make sure it looks about right.
Step 6 – Paint the color swatch.
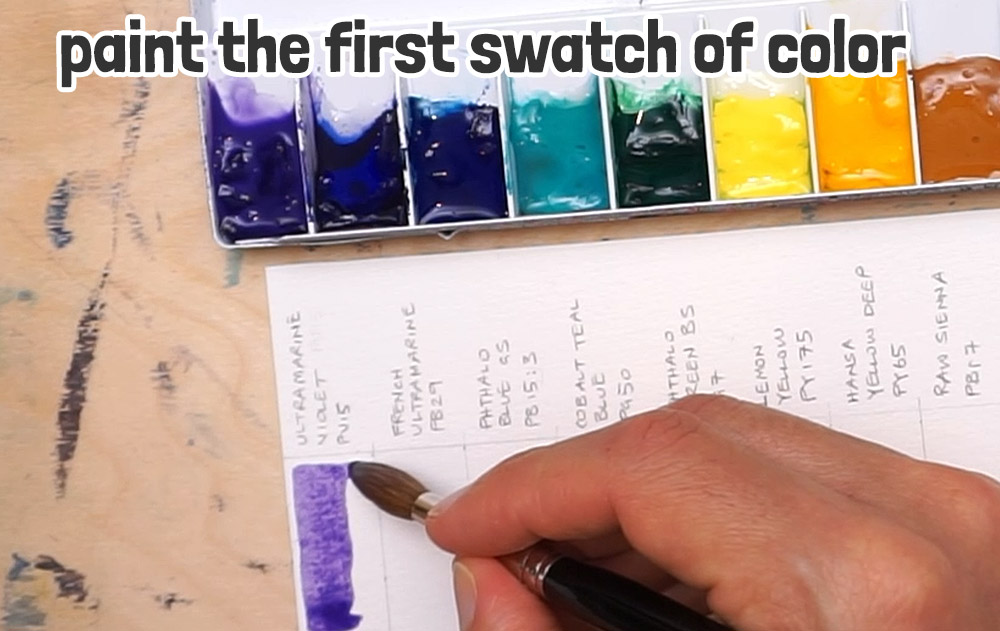
Fill in the first box with that color. It doesn’t need to be perfect or reach the edges of the box. The aim is to get a swatch of color that represents the paint at a medium strength – not too strong, not too diluted.
Step 7 – Rinse and repeat.
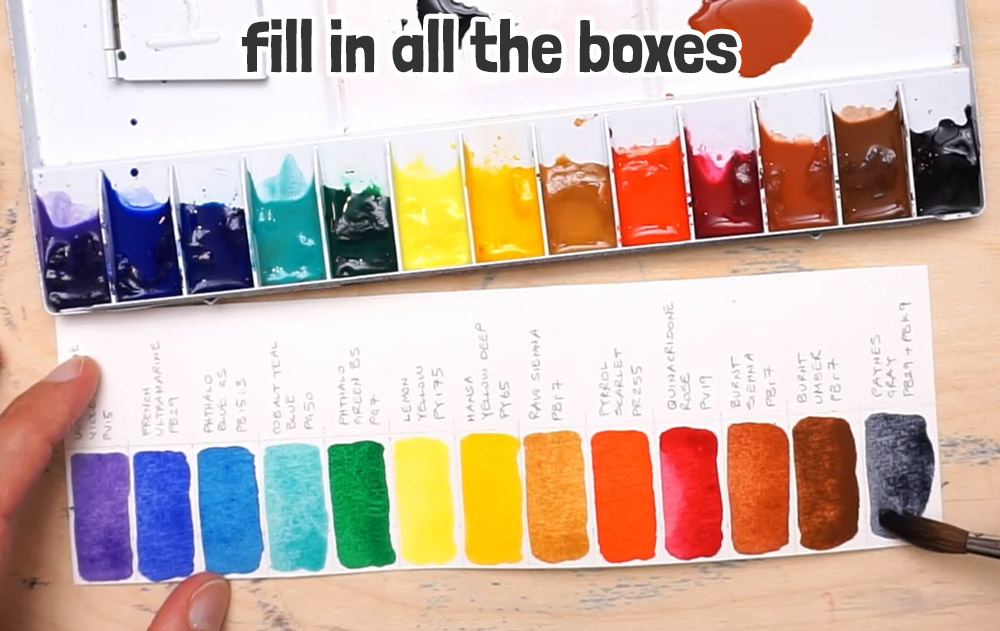
Rinse your brush really well – you want to avoid contamination from the previous mixture (this is where the two-jar system helps). Then move on to the next color…
Keep repeating the process until all your boxes are filled.
Step 8 – Let it dry
Once you’ve got all of the colors painted, put the chart to one side and let it dry completely.
And there you go – your very own palette chart!
Over time, as you paint more and more, you’ll probably know your palette like the back of your hand. But for now, this handy little chart saves you from hunting for colors and lets you focus on the fun part: painting!
Once your chart is done, it’s a good idea to clean up the palette. I usually start with a damp paper towel to lift any dry pigment, then finish with a dry one to leave the surface completely clean.
Then close the palette to keep your paints protected from dust.
The last step of any painting session is to take care of your brushes…
Cleaning Brushes
Watercolor brushes aren’t cheap, but with a bit of care they can last for years. After each painting session, rinse your brushes thoroughly in clean water until no more color comes out. Gently squeeze out the extra water – trying not to yank on the hairs – and then reshape the tip with your fingers. Lay the brush flat to dry.
Never leave brushes standing upright to dry, because water can seep into the ferrule and loosen it over time.
Doing this helps your brushes stay sharp, hold their points, and be ready for your next painting.
So that’s it.
You’ve set up your materials, arranged your palette, created your chart, and learned how to care for your brushes. Now you’ve got a routine and a reference tool that should make every painting session easier and more enjoyable.